This toy gun shoots spent 9mm casings, and is powered by rubber bands and springs. It’s easy and fun to make, and can be made with junk you find around any workshop.
This gun is a repeater! It has a built-in “magazine” that holds 7 shells, and automatically feeds them into the chamber as you shoot.
This wood gun will launch 9mm brass (or any same-sized 9-10mm wood dowel pieces) around 10-20 feet, depending on the spring you use.
Obligatory warning: Don’t point anything that launches projectiles at another person, pet, or your eye (because you’ll shoot your eye out.)
Step 1: Parts You Will Need
You will need the following supplies:
1) 1/2″ wood stock: HARD plywood or hardwood.
2) 1/8″ wood stock: I prefer the nice Baltic Birch plywood they sell at hobby stores. Plexiglass, Masonite, or any other cut-able, drill-able material would also work.
3) Two rubber bands. “Silly Bands” work good, if you have them
4) A few very small, skinny wood screws, around 1/16th” or 1-1.5mm thick. If you can’t find these, you can use superglue instead.
5) Two machine screws (fine threads, flat ends) around 3/32″ or 2-2.5mm in diameter
6) OPTIONAL: A big spring about 9mm in diameter and 2-3 inches long. I found one in a junk dollar-store dart gun toy. You can use a normal rubber band if a suitable spring is not found.
7) A small spring, OR a piece of flat spring steel such as found on the back of picture frames (check Goodwill) OR if all else fails, a springy chunk of rubber the size of a pencil eraser.
8) One standard finishing nail – around 1.5mm or 1/16″ thick
9) Projectiles: 9mm brass OR similarly-sized dowel pieces (9-10mm x 19mm)
Step 2: Tools You Will Need
You will need these tools:
1) Wood glue or superglue
2) Sandpaper, various grits
3) A laser cutter, OR scrollsaw, Or coping saw, OR jigsaw with fine blade
4) Screwdrivers to match your screws
5) Wire cutters OR pliers with nippers OR a hacksaw to cut the finishing nail down to size.
6) A drill and small bits
Step 3: Cut and Prepare the Wood Parts
I have attached a PDF to this instructable that has the outline of all parts. Print it and transfer onto your wood using your favorite method. The simplest way is to cut out the paper parts with scissors, and carefully trace around them.For those of you with CNC cutting machines, I have also included all dimensions. I am also jealous 🙂
Cut Notches:
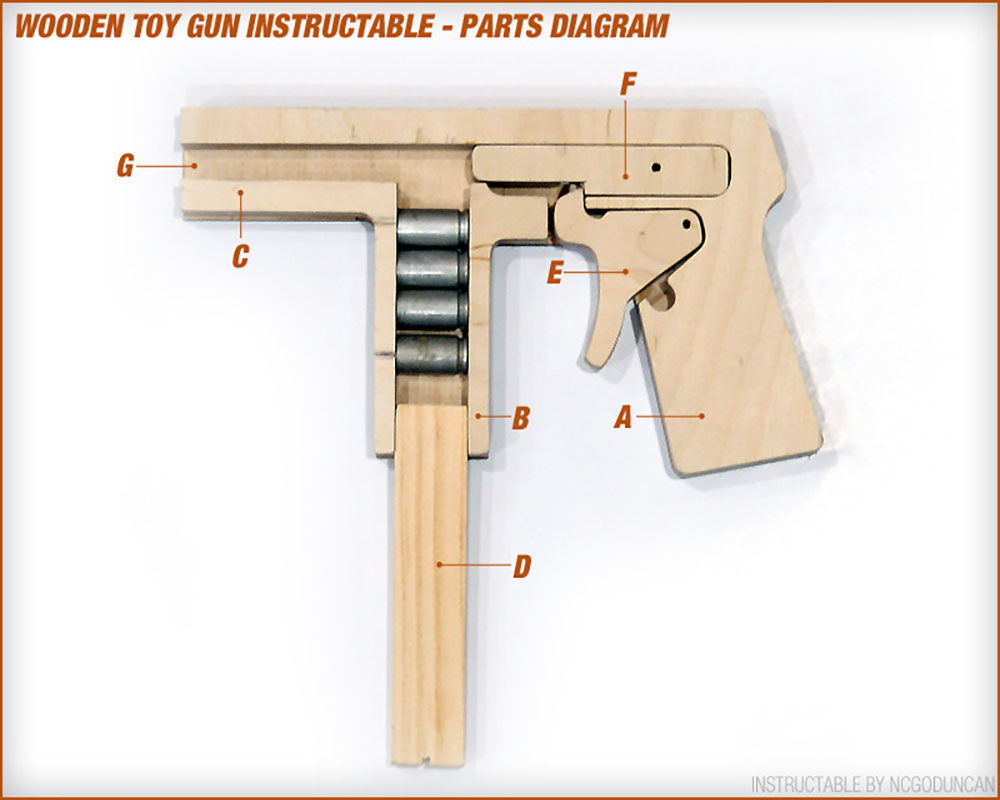
For those of you without CNC cutting machines, the notches on parts A, C, D and G are just to hold rubber bands, so you don’t have to be that specific on the dimensions.
Drill Holes:
The hole in part F will be sized to fit your machine screws and should be around 3/32″ or 3mm
The hole in part E will loosely fit your finishing nail and will be around 1/16th” or 1.5mm
The hole in parts G will tightly fit your finishing nail and will be around 1/32″ or 1mm
The slot in parts G will need to loosely accept your machine screws.
After cutting out all of the parts, refer to the photo for an idea of how they will be arranged.
Step 4: Sand All Surfaces That Touch Moving Parts
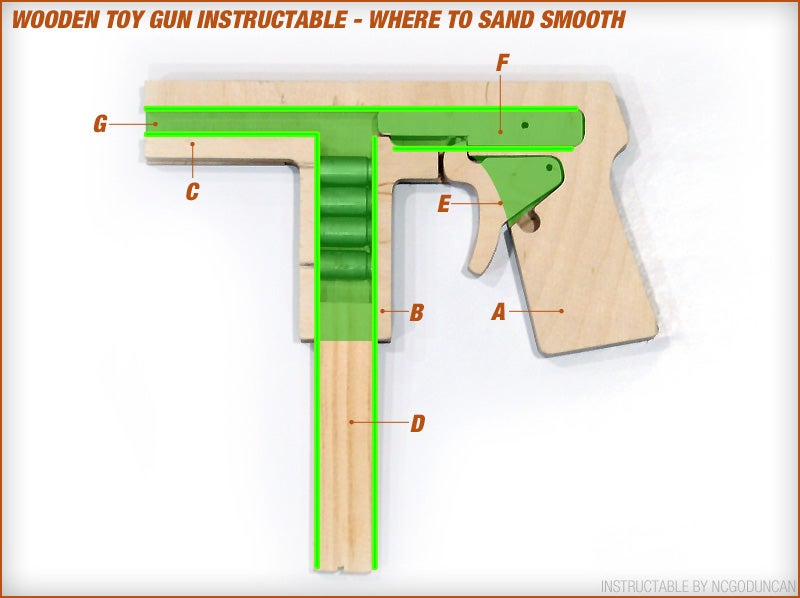
Now get out that sandpaper and sand all surfaces that will touch any moving parts. You need to get these as smooth as possible. I recommend ending with 400 grit if you have it.Sand everywhere I’ve marked in green.
1) Sand inside of both 1/8 sheet halves (parts G, shown in dark green)
2) Sand the bolt on all sides (part F)
3) Sand the insides of parts A, B, and C
4) Sand both sides of the trigger (part E)
5) Sand all sides of the magazine follower (part D)
Step 5: Begin Assembly
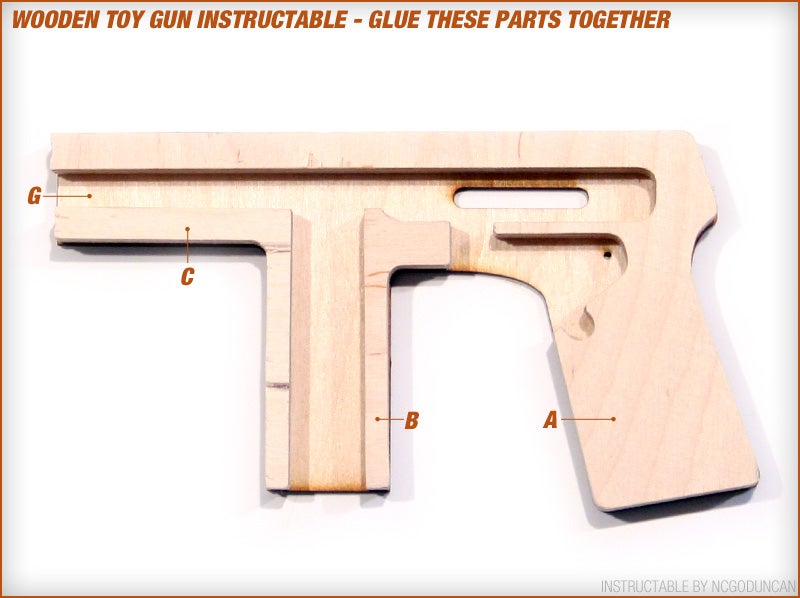
Glue parts A, B and C to one half (part G) as shows in the picture.
Note: try not to get excess glue anywhere on the inside where there will be moving parts.
Allow the glue to cure, then move on to the next step!
Step 6: Assembly: Trigger Setup
Secure the trigger (part E) to the back half (part G) using the finishing nail. Push the nail in through the hole in the back, point up. You’ll cut it off later.Make sure the trigger rotates freely around this finishing nail. You might need to enlarge the hole in the trigger part a little.
Now set up your trigger spring. See the illustrations for the three different options.
1) if you found a suitable spring, you can put it into the notch.
2) If you found a flat piece of spring steel, you can attach it like this (this is what I did with mine.)
3) If all else fails, a new pencil eraser or other piece of springy rubber night work.
Step 7: Assembly: Bolt Setup
Insert the bolt (part F) down into the spot above the trigger and screw in one of your matching machine screws into the pre-drilled hole, up from the back side. Put the screw in halfway. The screw will go in thru the notch in part G. Be sure to size the hole in the bolt properly so you don’t split it when inserting the screw. The other machine screw will go into the other side later, as shown in the diagram.
Spring or rubber band?
If you found a big spring that is slightly less than 1/2″ in diameter and around 2-3 inches in length, then you can insert it in behind the bolt (part F.) Otherwise, you can use a rubber band to launch the projectiles.
Step 8:
Now, we attach the other side (part G). You can use glue instead of screws, but it’s nice to be able to get this back apart if you need to adjust something.
I recommend pre-drilling the screw holes to prevent splitting.
The finishing nail will come up thru the hole in part G.
Step 9: Final Assembly
After screwing on the other side, snip off the finishing nail flush with the wood, and insert the second machine screw into the bolt (part F).
If you did not use a main spring inside behind the bolt (part F) then you will need to attach your rubber band as shown in the photo. You can experiment with different rubber bands for more or less power.
Step 10: Using Your Toy Gun
Insert 9mm shells into the magazine flat side back. Alternatively, insert similarly-shapes projectiles into the magazine. This design will hold up to 7 at a time. The projectiles should roll in freely.
Insert the wood follower and wrap the rubber band around it as shown. This gives it pressure which allows it to advance to the next round when the bolt is cocked.
Cock the gun by pulling the bolt backwards. The follower will push a round into the “chamber.”
Point in a safe direction and pull the trigger. Cock the bolt back and fire again – repeat until your foes are vanquished.
Refer to the video for more details, and leave a comment if you need help!


